Wednesday, March 30, 2016

New Assignment: Remake a Classic Work of Art with Photography

Hello Students,
Your next assignment is an exercise in planning, preparation, creativity with location and costume and direction of your model. The idea with this project is to remake a classic work of art using photography and you must demonstrate mastery of light and exposure to create your image in-camera... no post processing is allowed!

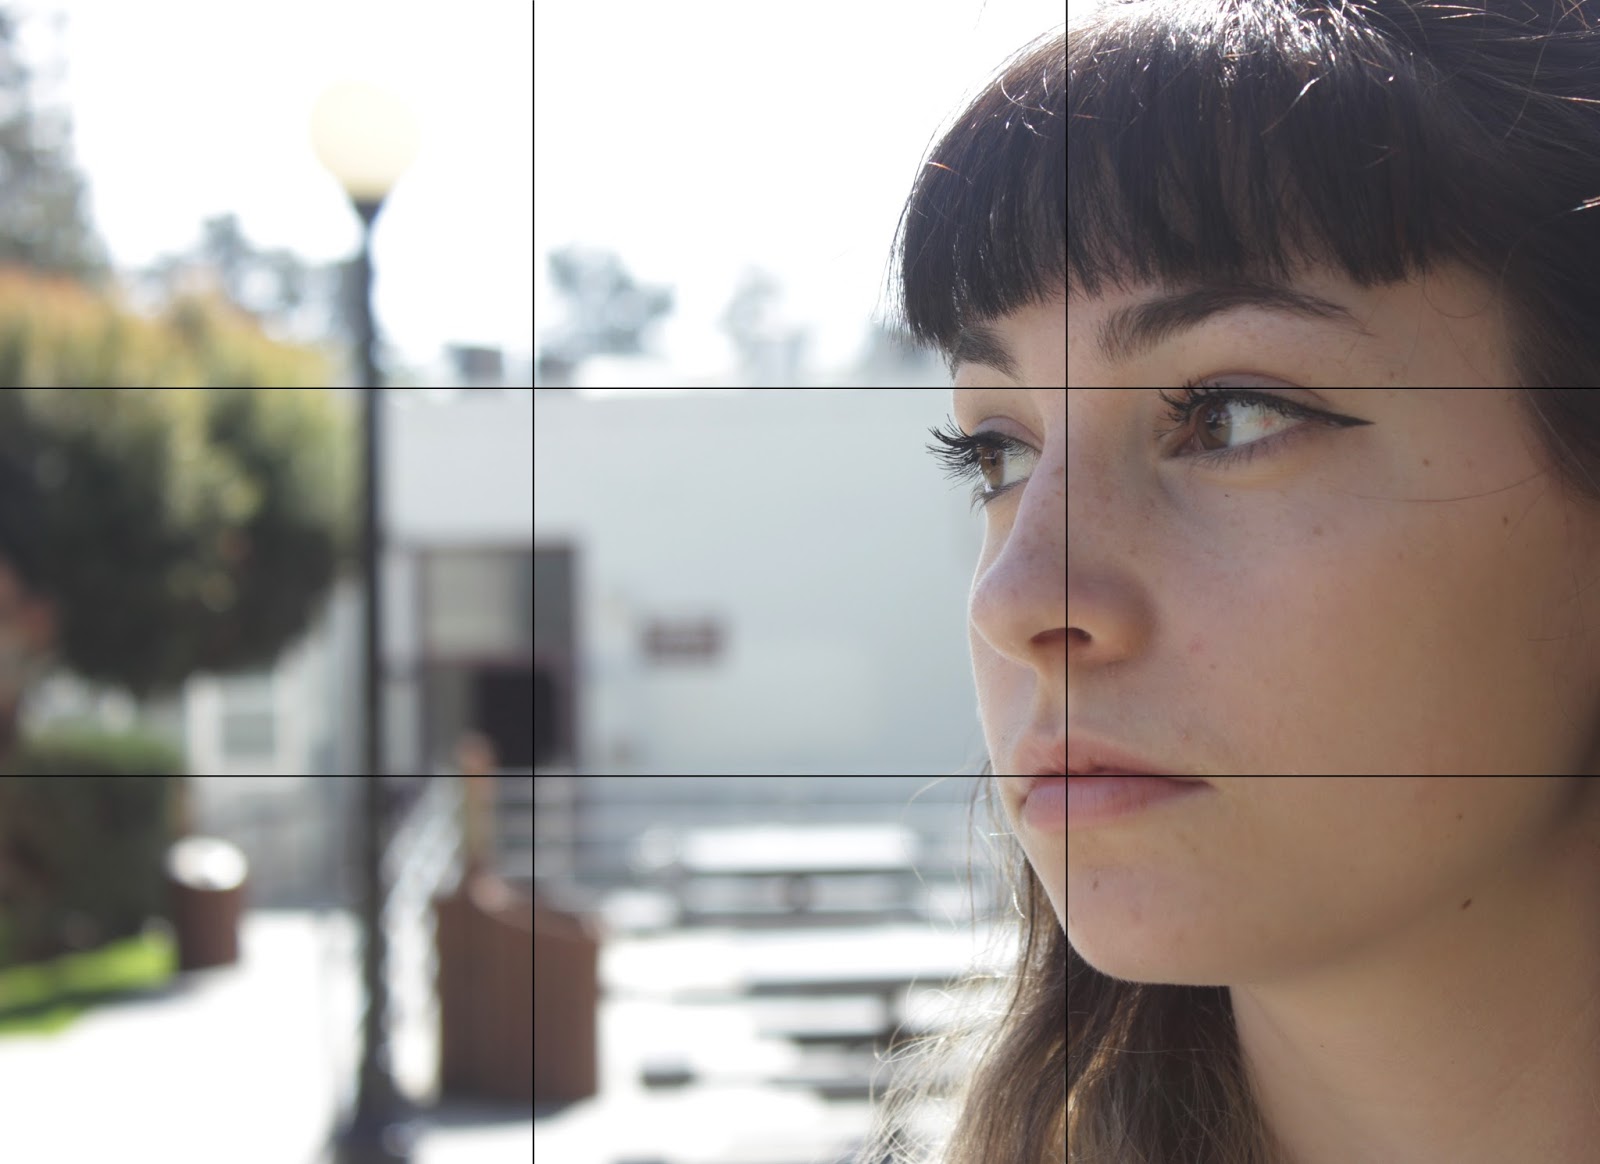
 In this photographic recreation of Egon Schiele's "self portrait with physalis" the student created a hand painted backdrop and applied make up to match the original artwork. Photography by Jared Wilson

Remake A Classic Work of Art With Photography:

  • Look through the examples and links below for clarification and inspiration
  • Research and find a classic work of art that inspires you. Your final choice of artwork to remake must be approved by your instructor before proceeding
  • Keep it classic, think old masters. Im not looking for contemporary artwork, album covers, fashion photography or cinematic references. We want artwork from between 1450 to 1830's and you must be able to identify the artist.
  • Final result is a photo only, no color correction, cropping or special effects allowed. If you do it correctly the majority of work happens before you take the picture. For this project post processing is banned. You will need to pay attention to the light in your image and recreate it as best you can. Take many images and adjust exposure, white balance and use in-camera filters or effects to achieve your desired results.
  • Put all of your creative energy into the arrangement and recreation of elements. Pay attention to costume, color, light, position, framing, facial expression, body and limp position etc... the key is in the details. Take shots and look at them closely, if something isn't right than re-shoot.
  • Elements in your artwork can be re-imagined of course. Strive for recreation of details with whatever you have available and at hand
  • Choose and get approval on your artwork of choice before proceeding!

Grading:
This project will be evaluated on your ability to meet the requirements as well as the intention of the assignment. Your work should show careful planning and execution. You are the artist with a vision and it is your responsibility to direct your costume, scene, model and props to achieve your desired results. Having total control over all elements is key to a successful photo shoot.

An example of high performing student work: This is a lovely recreation of Daniel Hernandez Morillo's "woman carrying firewood". The student photographer, Gracie Thomas, took great care with costume, pose, light, props, setting and composition for spectacular results.

This is an example of low performing student work. The student grabbed a bike, a blanket and a model at the last minute and took a snapshot. Little care is put into setting, light, costume, pose, composition.


Required Reading Links:

Student Work Samples:

High Performing:


Medium Performing:


Good Luck!

- Mr.W

Advanced Students: Rule Of Thirds Field Mission

Hello Students,
Your new assignment is a field mission utilizing the rule of thirds. Details are below. This assignment is due at end of class tuesday.

Rule Of Thirds Field Mission:
Create 10 Photographs using the rule of thirds. You must properly compose, expose and capture pictures of the following:

Subject Specifications:
  1. A person facing the camera, closeup on head
  2. A person facing the camera, closeup on head, looking to the upper right or upper left
  3. A person facing the camera, closeup on head but turned 45 degrees from camera and not looking at camera
  4. Two people facing the camera, closeup on heads looking into camera
  5. Two people facing the camera, closeup on heads but subjects are looking to the upper right or left
  6. Two people, one in the foreground, one in the background out of focus (depth of field)
  7. Two people, one in the foreground out of focus, one in the background in focus (depth of field)
  8. An object or objects
  9. A landscape view
  10. A tree
Assignment Specifications:
  • Shoot at least 10 images of each subject to obtain the best composition, exposure and quality
  • You must shoot in manual mode, each photo must be properly exposed
  • Using Photoshop, crop your photos appropriately if you need to
  • Post a contact sheet of all your images
  • Choose 3 of your best images and overlay a rule of thirds grid on top. Use the line tool or pencil tool to draw the simple grid. Screenshot and add your EXIF data of each final image to confirm manual mode

To See A Rule Of Thirds Grid in Photoshop:
  1. View > Show > Grid
  2. Go to Photoshop > Preferences > Guides, Grids and Slices
  3. Set: Gridline to 33.3333 Percent
  4. Set: Subdivisions to 1
Grading Rubric:
2 Points: Images properly exposed and in focus
2 Points: Images show proper mode and focus use (manual
2 Points: Contact sheet is included with at least 100 images or more
2 Points: Images utilize rule of thirds and capture each subject
2 Points: Grid overlay shown on 3 best images alongside 3 best images without grid

Student Work Examples:


Have fun! - Mr.W

Thursday, March 24, 2016

Principles of Exposure: ISO and Noise

Assignment: Understanding ISO
Students, your new assignment is a challenge for you to demonstrate an understanding of ISO and how to adjust both Aperture and Shutter Speed to maintain proper Exposure across multiple ISO settings. In this assignment you will find a still life subject, and shoot 4 images that have similar exposures but increase in ISO. Little change should be seen in light/dark values, only additional grain/noise should be noticed as increasing. Overlay your images as shown below and document your exposure settings.


Notice the increase in shutter speed and decrease in aperture size that was required to maintain exposure levels across the 4 iso ranges


Assignment Deliverables:
Part A:
  1. Produce a series of images (4) that demonstrate the impact that ISO has on the noise in an image while maintaining consistent exposure. Choose a creative still life subject and produce 4 images showing the range of ISO settings from low to high. Mimic the ISO Comparison images above. You will need to adjust either shutter speed or aperture to keep even exposure, don't let the different examples get darker or lighter.
  2. Compile the images in slices to show the even exposure levels, as illustrated above


Part B: 
  1. Written Synopsis of the Exposure Principals. Write a short 3 paragraph description of the three principals of exposure, shutter speed, aperture and iso, what they mean and how you utilize them in photography. 
  2. Email your essay to the instructor for credit


- Due following thursday
- Mr.W

Advanced Students: Color Channel and Blending Mode Manipulation

Hello Students,
Fine art photography and experimental photo techniques like infrared photography can be created with Photoshop. Part of the key to tapping into the power of photoshop is understanding Color Channels, and how layers can be manipulated with Blending Modes. In this project you will convert your Color Channels to Layers filled with the colors of your choice, and then experiment with different blending modes. The results will be surprising. The idea here is to be creative and try to achieve an artistic exposure effect. Essentially replacing the standard RGB values with your own values/gradients/images etc.
Digital images are created with 3 channels of color, Red, Green and Blue. You will convert the color channels in your image into colored layers, and then manipulate them with blending modes.
This image was separated into color layers in PS and the blue layer was replace with a blur orange gradient

Experiment with filling red layers with blue colors, or green with yellow and then changing the blending modes.  In this image I used a Gradient to achieve my desired effect of drawing the eye into the center of the flower couples with blending mode to enhance the effect.


Color Channel and Blending Mode Experimentation Assignment:

Convert Color Channels to Color Layers:

  • Open a photograph of your choice. Chose a photo that shows rich colors.
  • Open Layer palette and Channels Palette side by side
  • Select Red Channel to view that channels value in greyscale
  • Command-Click the Red Channel Icon to turn it into a Selection
  • Click on the RGB Channel to restore to full color
  • Make a new layer, click your Color Icon and create a new Layer. Fill that Layer with Red.
  • Hide that layer and repeat that process until you have a layer that represents each color in the Color Channel, Red, Green and Blue

Your Layer Palette should look like this when complete. You can change the white layer for a black one to achieve different results
  • Create a layer of white and place behind your Red, Green and Blue Layers
  • Change the Blending Mode of the top Layer until you find a desirable result
  • Continue changing blending modes and re-arranging color layers and save 3 different versions that you find artistically pleasing
  • Repeat this process with a second image of your choice and upload to the flickr page
Original


Have fun!

- Mr.W

Thursday, March 10, 2016

Lighting Principles: Studio Lighting Patterns

Hello Students,
Having a studio environment and using studio lighting is the best way for a photographer to have total control over the lighting and background elements in their photos. Different lighting positions are used to enhance facial features, eyes, hair... and to create different moods, atmosphere and effects in the photo. We will cover some basic lighting set ups and then you will work in groups to create examples of the different lighting positions for portraiture.

When you begin to recognize lighting patterns you can experiment with placement, shadows and light effects.
Studio Lighting Patterns:
Lighting patterns pertains to how the light and shadows fall across the face. We all know that harsh outdoor lighting can be unflattering to our subjects, casting deep shadows under the lips, in the eye sockets and neck area. By using studio lights we can create pleasing light patterns with rich tonal value to accentuate our subjects facial contours. Different lighting set ups work better for women and men separately, and it is important to know the basics, once you have an understanding of basic light patterns you can begin to experiment and achieve the results you desire in each of your portraits.

1: Split Lighting
Split lighting is a simple, single light set up. It is called split lighting because it divides the face into light and dark areas. This setup tends to be rather dramatic in effect. To achieve this look the light is placed 90 degrees to the left or right of the subject. Any lighting pattern can be used on any facial position, but the light may need to be moved in relation to the subjects face for best results.

Term Definition - Catch light: Sometimes the subjects eyes may be too dark in a split lighting set up, so often a "catch light" is used in front of the subjects eyes to fill the reflections in their eyes and to avoid a "dead" look in their eyes. This catch light can be a big diffused umbrella light, not bright enough to affect the split light set up, but just enough to cause some reflection in the eyes, brightening up the subjects look over all.

2: Loop Lighting
Loop lighting is when lighting is positioned to create a shadow of the viewers nose falling across the face. To create this look the light position must be slightly higher than eye level and about 30-45 degrees from the camera. This positioning may need to change with each person, everyones face is different. Learn to read your subjects face, in loop lighting the shadow of the nose and the shadow of the cheek shouldn't touch. Adjust light as needed to achieve this. Loop lighting is a common method as it is usually flattering to the subject and is easy to achieve.

3: Rembrandt Lighting
So named because the same lighting is used in Rembrandt's paintings. This set up is identifiable because the shadow created by the nose and the cheek do touch, creating little triangle highlights under the subjects eyes. Proper Rembrandt lighting should also use a catch light on the shadow side of the face to keep the eyes from looking lifeless. This is a dramatic lighting set up that creates a deep mood. If your subject has high cheekbones this is a good method, if their nose is very short or shallow you may need to adjust your lighting to achieve the light triangle so endemic of this method. To create Rembrandt lighting the subject must turn slightly away from the light and the light must be above the top of the head. Not everyone's face is ideal for this method, so do what looks best and is most flattering.

4: Butterfly Lighting
This lighting setup is named because of the butterfly shaped shadow that is created under the subjects nose. In this setup the light is placed above and behind the camera. This setup is used for glamour lighting and to create shadows under the cheeks and chin. It can be flattering for older subjects as it tends to minimize the shadows in wrinkles, which would be more pronounced in side lighting. Sometimes in Butterfly lighting a reflector is placed under the subject, sometimes the subject will hold the reflector themselves. This pattern flatters subjects with thin faces and high cheekbones.


Studio Light Styles / Broad Lighting:
Broad lighting isn't a pattern itself but a style of pattern, any of the above patterns can be broad or short. Broad lighting refers to the subjects face being turned away from the camera so that the lighted area of the face is broader and the shadow areas are smaller or shorter. This type of lighting can make a persons face appear wider and may not be flattering, or it can be used to make a thinner persons face seem fuller.

Short Lighting:
Short lighting is the opposite of broad lighting, the subjects face is turned towards the light making the shadow area smaller, and often more flattering. It puts more of the face into shadow, adds depth to the image and tends to me more slimming and flattering.


Studio Lighting Assignment:
Pair up with 3-4 others and sign up for some time in the studio. We only have one studio so we will need to share. When you use the studio be extremely careful when handling the lights to avoid broken bulbs and broken equipment. Take turns acting as models and create examples of the following light setups:
  • Split lighting
  • Loop lighting
  • Rembrandt lighting
  • Butterfly lighting
  • Broad lighting (in any pattern)
  • Short lighting (in any pattern)
  • Experimental (choose a light position/pattern/technique and get creative with it)


Post process or shoot your images as B&W images to demonstrate the proper lighting patterns, B&W can show tonal patterns and light/dark areas with more clarity than a color image. Post your 7 best results to your blog when complete.

Have fun!

- Mr.W

Student Examples:


Advanced Students: Keepin' It Surreal

Hello Students,
Your newest assignment is an exercise in surrealism. You must pre-plan your image with a few pencil sketches so you can plan and shoot all the elements you need. Post processing is acceptable and encouraged, you can use all the software tools available to you to achieve the final image you have in your mind.

"To be a surrealist... means barring from your mind all remembrance of what you have seen, and being always on the lookout for what has never been." - Rene Magritte
"My idea of a perfect surrealist painting is one in which every detail is perfectly realistic, yet filled with a surrealistic, dreamlike mood. And the viewer himself can't understand why that mood exists, because there are no dripping watches or grotesque shapes as reference points. That is what I'm after: that mood which is apart from everyday life, the type of mood that one experiences at very special moments."- Ian Hornak

What is Surrealism?
Taken from the Heilbrunn timeline of Art History: "Surrealism originated in the late 1910s and early '20s as a literary movement that experimented with a new mode of expression called automatic writing, or automatism, which sought to release the unbridled imagination of the subconscious. Using Freudian methods of free association, their poetry and prose drew upon the private world of the mind, traditionally restricted by reason and societal limitations, to produce surprising, unexpected imagery. The cerebral and irrational tenets of Surrealism find their ancestry in the clever and whimsical disregard for tradition fostered by Dadaism a decade earlier. The visual artists who first worked with Surrealist techniques and imagery were the German Max Ernst (1891–1976), the Frenchman AndrĂ© Masson (1896–1987), the Spaniard Joan MirĂ³ (1893–1983), and the American Man Ray (1890–1976).

Keep It "Surreal" Assignment:
  • Research surreal art, artists and photography for inspiration
  • Brainstorm a few ideas and create a full page pencil sketch of your idea. Try to think of all the visual elements you would like to incorporate... consider setting, backgrounds, models, objects or props, costume, stylistic effects. Plan every detail of your shoot for best results. I expect QUALITY work.
  • Begin shooting your photo(s) and use photo manipulation to achieve your desired look with Photoshop
  • All processes are available to you, cropping, fine edge selection, airbrushing, colorization, layering, enhancement effects etc... try to achieve a worked over and artistic look to your image
  • Post your image to our flickr page when complete


Image by Gala Darling
This photo was shot live, no amount of post-processing or Photoshop has been used to achieve this effect. It took 26 attempts and 5 hours. Philip Halsman would count to four, where Dali would leap into air, and three assistant will throw the cats, another will throw a bucket of water, and Mrs. Halsman held the chair.

Student Work Examples: