Wednesday, October 28, 2015

Principles of Exposure: Capturing and Controlling Value


Hello Students,
Having a studio environment and using studio lighting is the best way for a photographer to have total control over the lighting and background elements in their photos. Different lighting positions are used to enhance facial features, eyes, hair... and to create different moods, atmosphere and effects in the photo. We will cover some basic lighting set ups and then you will work in groups to create examples of the different lighting positions for portraiture.

When you begin to recognize lighting patterns you can experiment with placement, shadows and light effects.
Studio Lighting Patterns:
Lighting patterns pertains to how the light and shadows fall across the face. We all know that harsh outdoor lighting can be unflattering to our subjects, casting deep shadows under the lips, in the eye sockets and neck area. By using studio lights we can create pleasing light patterns with rich tonal value to accentuate our subjects facial contours. Different lighting set ups work better for women and men separately, and it is important to know the basics, once you have an understanding of basic light patterns you can begin to experiment and achieve the results you desire in each of your portraits.

1: Split Lighting
Split lighting is a simple, single light set up. It is called split lighting because it divides the face into light and dark areas. This setup tends to be rather dramatic in effect. To achieve this look the light is placed 90 degrees to the left or right of the subject. Any lighting pattern can be used on any facial position, but the light may need to be moved in relation to the subjects face for best results.

Term Definition - Catch light: Sometimes the subjects eyes may be too dark in a split lighting set up, so often a "catch light" is used in front of the subjects eyes to fill the reflections in their eyes and to avoid a "dead" look in their eyes. This catch light can be a big diffused umbrella light, not bright enough to affect the split light set up, but just enough to cause some reflection in the eyes, brightening up the subjects look over all.

2: Loop Lighting
Loop lighting is when lighting is positioned to create a shadow of the viewers nose falling across the face. To create this look the light position must be slightly higher than eye level and about 30-45 degrees from the camera. This positioning may need to change with each person, everyones face is different. Learn to read your subjects face, in loop lighting the shadow of the nose and the shadow of the cheek shouldn't touch. Adjust light as needed to achieve this. Loop lighting is a common method as it is usually flattering to the subject and is easy to achieve.

3: Rembrandt Lighting
So named because the same lighting is used in Rembrandt's paintings. This set up is identifiable because the shadow created by the nose and the cheek do touch, creating little triangle highlights under the subjects eyes. Proper Rembrandt lighting should also use a catch light on the shadow side of the face to keep the eyes from looking lifeless. This is a dramatic lighting set up that creates a deep mood. If your subject has high cheekbones this is a good method, if their nose is very short or shallow you may need to adjust your lighting to achieve the light triangle so endemic of this method. To create Rembrandt lighting the subject must turn slightly away from the light and the light must be above the top of the head. Not everyone's face is ideal for this method, so do what looks best and is most flattering.

4: Butterfly Lighting
This lighting setup is named because of the butterfly shaped shadow that is created under the subjects nose. In this setup the light is placed above and behind the camera. This setup is used for glamour lighting and to create shadows under the cheeks and chin. It can be flattering for older subjects as it tends to minimize the shadows in wrinkles, which would be more pronounced in side lighting. Sometimes in Butterfly lighting a reflector is placed under the subject, sometimes the subject will hold the reflector themselves. This pattern flatters subjects with thin faces and high cheekbones.


Studio Light Styles / Broad Lighting:
Broad lighting isn't a pattern itself but a style of pattern, any of the above patterns can be broad or short. Broad lighting refers to the subjects face being turned away from the camera so that the lighted area of the face is broader and the shadow areas are smaller or shorter. This type of lighting can make a persons face appear wider and may not be flattering, or it can be used to make a thinner persons face seem fuller.

Short Lighting:
Short lighting is the opposite of broad lighting, the subjects face is turned towards the light making the shadow area smaller, and often more flattering. It puts more of the face into shadow, adds depth to the image and tends to me more slimming and flattering.


Studio Lighting Assignment:
Pair up with a partner and sign up for some time in the studio. We only have one studio so we will need to share. When you use the studio be extremely careful when handling the lights to avoid broken bulbs and broken equipment. Take turns acting as models and create examples of the following light setups:
  • Split lighting
  • Loop lighting
  • Rembrandt lighting
  • Butterfly lighting
  • Broad lighting (in any pattern)
  • Short lighting (in any pattern)
  • Experimental (choose a light position/pattern/technique and get creative with it)


Post process your images as B&W images to demonstrate the proper lighting patterns, B&W can show tonal patterns and light/dark areas with more clarity than a color image. Post your 6 best results to your blog when complete.

Have fun!

- Mr.W


Thursday, October 22, 2015

Principles of Exposure: Aperture, depth of field and focus

Exposure: Aperture
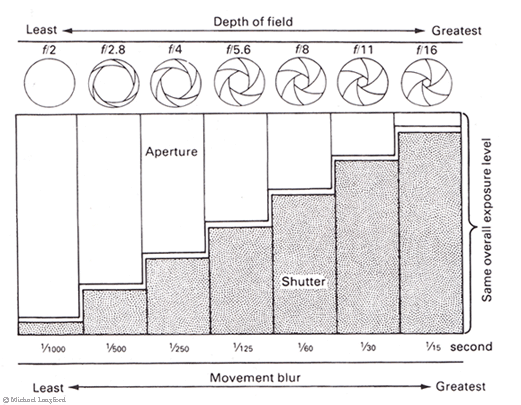
Notice in this chart that the wider apertures have a narrow DOF, while the smaller aperture has a larger DOF. Additionally the shutter speed must be sped up or slowed down depending on aperture setting.

Aperture is a mechanical feature on the camera lens that adjusts the amount of light that is let into the camera. The size of the aperture also changes the depth of field range, a term for the area of an image that is in focus. 


A larger aperture will create a narrow depth of field and allow the maximum amount of light in the camera, so a faster shutter speed may be used. This is great for artistic images, street photography, portraiture and still life. The depth of field can be very slim with a wide open aperture resulting in more emphasis on the subject.


A smaller aperture is used when the depth of field must be wider. This also allows a sharper image to be captured because the flatter part of the lens is being used... resulting in less distortion fringing of details. Great for images that need increased detail, landscapes, nature photography, architecture.


When a smaller aperture is being used to control depth of field, adjusting the focus on the lens can change the position of the DOF. You can move the DOF closer or farther away. Many lenses will focus automatically, but you can disable that to adjust the focus yourself.


Our artistic element of the week is "Value". Value refers to the tonal quality of an image, tonal quality is, IMHOP best evaluated through a black and white image. If you shoot in black and white or experiment with black and white conversion with an image editing program, you will learn to see opportunities for good value in b&w photography. Good tonal quality should show as many levels of value as possible, from bright to dark and everything in between.

Key Assignment 6: Aperture and Value
Students, your new assignment is to develop an understanding and demonstrate control of depth of field. Additionally we are focusing on value in photography by shooting black and white imagery

Assignment Deliverables:

1- Depth of Field Portrait: Create 2-3 portraits that demonstrate depth of field. Use a wide open aperture setting and look for good backgrounds for your subjects

2- Near/Far Focus: Arrange 2 people 10 feet apart from each other. Produce 1 image that shows the subject closest to you in focus, then change your focus to show the subject farthest away from you in focus.

3- Value/Contrast through B&W: Set your camera to shoot in Black and White only. Take 1 photo each day of the week that captures "value". Look for interesting compositions, light, contrast, patterns. You will need to shoot many images and experiment so you can learn to "see" in B&W value. Post your best 5 photos before next class.

- Mr.W

Wednesday, October 14, 2015

Principles of Exposure: Capturing Action and Controlling Motion Blur


Exposure: Shutter Speed, Aperture, ISO:
Exposure is the measure of light falling on the media, be it film or CCD. It's controlled by three factors namely shutter speed, aperture and sensitivity of the sensor (ISO). Let me try to explain each of these in a greater detail.

Shutter Speed is the amount of time the shutter screen remains open, in other words, it is the duration for which the light hits the media. Shutter speed is the feature of the camera and not the lens. Faster the shutter speed, lesser the duration for which light hits the sensor, so lesser amount of light is captured.

The shutter speeds range from 1/4000th of a second (1/8000 on a pro camera) to 30seconds, with a special "B" (bulb) mode wherein the shutter could be kept open as long as the photographer wishes (of course, constrained by battery).

The shutter speed controls another most important aspect - freezing the subject in time. Simply stated, you shoot a speeding car with slow shutter speed, you tend to see the trails of the car resulting from motion blur. On the other hand you shoot the same car with higher shutter speeds, the car will appear as though it is stationary. In case you're wondering what magic, the photographer has done to capture those long trails of headlights, the answer is simple: he would have just kept the shutter open long enough to capture the trails.

When you're shooting with slower shutter speeds (under 1/100th of a second) holding the camera, it is highly likely that you end up with a blurred photograph. Why? It's obvious that when you're shooting at lower speeds, even the slightest camera shake will contribute to the blurring of the photograph. Solution for this problem is to mount the camera on a tripod or try to find a platform nearby to place the camera and shoot.

The answer for the question "What shutter shutter speed to use for a particular shot?" is "It entirely depends on the kind of shot and it can't be generalized". If you're shooting birds, wildlife, sports, street shots etc. which require the moment to be captured tack sharp use high shutter speeds. Night shots, trail capture, abstract photographs, light painting, milky waterfall photographs etc. require slow shutter speeds.

Aperture is the feature of the lens and has nothing to do with the camera, except that the aperture values are set/controlled by the camera. As the name itself suggests, aperture is an "opening" at the rear end of lens through which the light enters the camera. Earlier days, the lens barrel had an aperture ring to set the required aperture values, but these days the aperture could be controlled by the knobs on the camera or changing a setting on the digital menu of a DSLR.


The maximum and minimum value of aperture depends, as mentioned earlier, on the lens and not on the camera. You may find a lens with aperture as big as f1 or f1.4 or as small as f45 or f64. Aperture is measured in terms of f-stops and hence the f. It's notated f/1.8 or f/5.6 as well. As you can see the size of the aperture is inverse to the value of f-stop, higher the f-stop smaller the aperture, smaller the f-stops bigger the aperture. So at f1.8 the light received by the medium will be more than f5.6; least light will be received at the smallest aperture say F22 of F45 or whatever your lens supports.


Like shutter speed, aperture also controls one other aspect, apart from the amount of light, it's called Depth of Field (DOF). You maybe confused by amateur photographers who are fond of terms like DOF, Bokeh, Hyperfocal distance etc. Just remember this rule of thumb & don't get lost in the jargon: Bigger the aperture, smaller (shallower DOF) the region of focussmaller the aperture larger (deeper DOF) the region of focus. You may, therefore, want to open up the aperture for a portrait shot wherein you want a focused and sharp face and blurred background and close down the aperture for a landscape shot wherein you want the entire landscape to be focused. Also in macro shots, the amount of DOF is very critical since the available DOF is very less. DOF is used sometimes to give artistic effects to the photographs.
Photo credit: Seth Wilson 2013
Portraits would come out well with bigger apertures (smaller f-stops) for it makes the subject really sharp against a background of soft background, Also night shots usually require bigger apertures which would allow lot of light to enter.

Landscapes need smaller apertures (bigger f-stops) for most times it wouldn't have a specific focus point. Smaller apertures help on a very bright day to cut-off excess light entering (of course this could be controlled by shutter speed too).


ISO is the measure of sensitivity of the media (film) and digitally is a camera dependent feature. ISO values are typically in the range of 100 to 3200 (on a pro camera it can have an extended range from 50-102400)

When the ISO is set to 100 the sensor is the least sensitive, it can sense less light. When it's set to 1600 or 3200, the sensor can sense a much more light. Which means for a given condition if ISO 100 gives a standard exposure with F8.0 & 1/250th of a second, ISO 1600 may give a standard exposure at F8.0 & 1/1000th of a second. ISO comes very handy while shooting hand-held under low light conditions, it gives an advantage of slightly faster shutter speeds which helps in avoiding motion blur.

An obvious question may arise to a novice, "Why should I shoot at low ISO when higher ISO gives an advantage of faster shutter speed?" Though ISO seems to be such a cool feature, it carries with it something very undesirable - NOISE. Higher the ISO, higher the noise.

Brighter the ambience smaller the ISO (unless you want grainy effect), darker the ambience higher the ISO.


To Make It Easy Just Remember The Rule of Equivalent ExposureEach Change In ISO Is Equal To One Full F-Stop
Imagine you've pointed your camera at a scene and it's recommending the following settings:
  1. A shutter speed of 1/100s 
  2. An aperture of f/5.6 
  3. A sensitivity setting of ISO 400 

We could make the photo appear twice as bright by doing any of the following:
  1. Doubling the shutter speed to 1/50s 
  2. Doubling the area of the aperture by increasing it one full f-stop, to f/4 
  3. Doubling the sensitivity setting to ISO 800 
Any of these could be described as increasing the exposure by 1 stop.

Likewise, to make the scene appear half as bright, we can reduce the exposure by 1 stop by taking one of the opposite steps: 
  1. Halving the shutter speed to 1/200s 
  2. Halving the aperture area by reducing it one full f-stop, to f/8 
  3. Halving the sensitivity to ISO 200. 
Note that we use the word "stop" even when we're not adjusting the f-stop (aperture) setting. It's just become a general term to mean a factor of 2.


Key Assignment 5: Capturing Action
Students, your new assignment is a challenge for you to demonstrate an understanding of the basics of exposure through capturing action and controlling motion blur. Create images that meet the criteria listed below

Assignment Deliverables:

This pelican was shot with a fast shutter speed to capture it in motion, even the water droplets splashing up are frozen in time. Photo credit Will Tierney 2015
1- Object Frozen in Time: Create 2-3 images of a moving object that is frozen in mid-action, this image must show no motion blur. For each image write a short description of the process used in taking the photo, what settings were used to create the visual effect and describe the affect the image may have on the viewer.


A fire spinner creates a silhouette of herself through motion blur. Photo credit Seth Wilson 2005
2- Object in Motion: Create 2-3 images that show an object in motion. The moving object must show motion blur. For each image write a short description of the process used in taking the photo, what settings were used to create the visual effect and describe the affect the image may have on the viewer.


3- Tracking Motion: Create 2-3 images that shows an object in motion with the background behind the object showing motion blur. For each image write a short description of the process used in taking the photo, what settings were used to create the visual effect and describe the affect the image may have on the viewer.


4- Zoom Blur: Create 1 image that shows zoom blur by cranking the zoom and taking a photo at the same time, try it a few times and post your best. For each image write a short description of the process used in taking the photo, what settings were used to create the visual effect and describe the affect the image may have on the viewer.

Post all images with accompanying written content to the flickr group when complete.

Due by following thursday...

- Mr.W

Thursday, October 8, 2015

Photography and Color: Theory and Application


Part A - Research and Slideshow:
Create a slide show using google doc slides, or any presentation software you prefer. Complete a slideshow that demonstrates the concepts and topics listed below. 

Assignment Specifications:
Create a slideshow that displays examples of the images listed below. Use the internet to research and find the images and incorporate them into your slideshow. Be prepared to discuss how the images achieve their appearance, is it caught in camera or created in post processing? How does the color dominance in the image affect the mood or emotion of the image, does it communicate a story and is the story altered by the color dominance?
  • Show 3 images that display Primary Colors
  • Show 3 images that show Secondary Colors
  • Show an image that displays Complimentary Color
  • Show an image that displays Analogous Color
  • Show an image that displays intense or saturated color
  • Show an image that displays desaturated or muted colors
Make your presentation visually interesting and be ready to present and discuss the images you are showing.

Presentations are due by the following thursday, email them to your instructor or turn in via usb thumb drive for credit.


Part B - Color Palette Generation From Photograph:
In the study of color theory, primary colors refer to the 3 or 4 color combinations that all other colors can be derived from. In photography, an image can have cool, warm, light, dark, saturated or unsaturated primary colors. In this short project we will extract the colors that make up our image. From that palette we can choose pleasing color combinations for layout purposes.

Step 1: Choose one of your own images you have taken for this class or pick one from the links below:

"Wearever whale" Image created by Seth Wilson 2012

Step 2: Navigate to this online palette generator, and upload your image as a JPG file. Here is the link : http://www.cssdrive.com/imagepalette/


Make sure you click "choose file" and upload your image....

Look for this link near the bottom of the page...

Step 3: After your image is done uploading, look at the palette it created for you, then download that palette as a Photoshop ICO File.


Step 4: Now switch over to photoshop. Create a document about 1000X900 pixels at 72 dpi. Copy-paste your photo into it, scale it down and leave some room on your document for your color palette. You will be creating shape layers and filling them with color from your custom color palette.


Step 5: On your Color Swatch / Sub-Menu, choose Replace Swatches...


Step 6: Navigate to the Photoshop ICO file you downloaded from the palette generator website.


Your color swatch tab should show your custom color palette loaded up, with no other colors available (you can change it back by choosing "reset swatches" from the submenu later on).


Step 7: After your palette is loaded, use a shape tool to draw a square, circle etc...


Step 7: Draw 1 object, then switch to the Move Tool and Option-Drag a copy....


With the Move Tool selected, and your object Layer selected... hold the option key and drag your copy...


Step 8: Continue this process.. each time you create a new object, select a new color from your custom palette by clicking on the swatch. Then you can use the Option-Delete command to fill with that color, or go to the Edit Menu / Fill / Using Foreground Color...


Continue this process until you have 20 different objects... fill these objects with the most dominant colors you see in your custom swatch palette.


Final Step: Add your name and some cool title text to your design and save it as a JPG and post to the group.


- Mr.W